Thursday, July 25, 2013

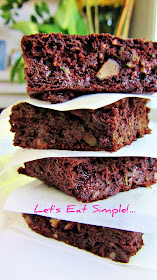
Whole Wheat Zucchini Brownies


I have been seriously craving for anything chocolate for the last two weeks and thinking of making something with chocolate but never had a time to make anything!  


Over the weekend, the hubby and I went to take a stroll in the old China town for the Summer Night event. There were little art and craft shops, band music and art performances, and food trucks! We got to taste the Indian chicken curry wrap and the crispy tofu balls with Sriracha aioli sauce. They were good and of course pricy! (Considering that I can do that at home!) Then we found two little cute dessert trucks. One was selling cupcakes and sweet treats, another was selling frozen yogurt and snow cone. The hubby’s eyes were lid up! We both went back and forth undecided which one to pick. Then I saw the brownies! Ohhhh I gotta have it. So, we got one big square to share, and it was so good with the intense chocolate flavor. We both were almost fighting over it! The brownie had satisfied my craving at the moment But after a while, I want some more! So, I decided to make my own brownies.


You know? Good brownies come with high calories. What I only want to do for my life now as I’m getting older is trying to stay healthy as much as I can. So, I searched for a good and healthy brownies recipe. I’ve found several awesome idea of zucchini brownies recipes, in which they called for different ingredients on each one. So, I adapted and revised on my own.


As a result, the zucchini brownies came out very moist, chocolaty, and stay really moist the next day. Thanks to the zucchini and applesauce. Only one thing that I felt a little, somewhat, disappointed was that I used semisweet chocolate chips which I should have used bittersweet chocolate chips instead for a little more intense flavor. But the hubby disagreed. He prefers milk chocolate; I prefer dark chocolate. You know how that goes!   However, the hubby has tasted unknowing there was zucchini in the brownies. And he really liked it.


By the time I finished taking photographs, I’ve finished eating two brownies already. Oh mine! Luckily, those zucchini made me felt less guilty about that. Whew!

Have you noticed something? There is no butter or oil in my brownies! And that what I call “healtylicious!” Woot Woot!!!

What you need:   makes 12-16 squares 

1/2 cup whole wheat flour
1/4 cup unsweetened cocoa powder
1 tsp. baking soda
1 tsp. cinnamon powder
1/8 tsp. salt
1/2 cup sugar
1 large egg
1/2 cup applesauce
1 tsp. vanilla extract
2 tbsp. brewed coffee, cool
1 cup grated zucchini
1/2 cup chopped walnuts
1/2 cup semisweet or bittersweet chocolate chips


How to:

- Preheat the oven to 350’F and line the 9x11 or 9x9 baking dish with parchment paper for easy removal
- In a large mixing bowl, combine flour, cocoa powder, baking soda, salt, cinnamon powder and set aside
- In a separate mixing bowl, whisk egg, sugar, vanilla, and applesauce
- Fold in the wet into the dry ingredients to mix well
- Fold in zucchini, chopped walnut, and chocolate chips and mix well
- Pour the batter into the baking pan and bake for 25-30 minutes top. Do not over bake!
- Let it cool completely before cutting into squares 
 
 
Enjoy!
 
^__^


Monday, July 15, 2013

Crab with Basil Pesto Crispy Pockets


As my usual self, when I first got the can of 1-lb crab meat from the market, I had no plan of what kind of dish I would be making with the crab meat. It’s been sitting quietly in my fridge for weeks, and the hubby kept reminding as he thought I forgot about it. Obviously, he didn’t know me that well. I never forget about food --- I just waited for the right moment, that’s all! ;-P


And today is the day! The hubby brought home a big bag of basil from Smart & Final with a plan of making basil pesto. He likes it so much and has been buying it from Fresh & Easy all the time. Now he decides to make his own! The pesto is very easy to make which a few ingredients and a food processor – basil, garlic, salt and pepper, pine nuts, olive oil, and Parmesan cheese. But the hubby’s pesto has a handful of baby spinach added into it which provide the rich gorgeous green to the pesto, and with a little additional of fresh squeeze lemon juice to avoid the bitter tart of spinach. The hubby’s pesto came out very nice and very very tasty!


As we’re dipping in with pita chips we bought from store, I am thinking that I could add this pesto into the crab meat, fill in the wonton wrappers, and fry them for appetizers, voila! Let’s do it!


These crispy crab pockets are the easy version of crab Rangoon, if you will, but lighter without cream cheese. For the dipping sauce, you can whip up any of your favorite dipping sauce but I thought that Thai sweet chili sauce would be perfect for this. Since the crab and the pesto mixture is very tasty and more of the salty side, the Thai sweet chili sauce could help balance it down a little – and it sure does!


What you need:   make 16-18 pieces

6 oz. crab meat
3 tbsp. basil pesto – homemade or store bought
2 tbsp. Parmesan cheese
18 wonton wrappers

1-2 cups vegetable oil for frying
Thai sweet chili sauce for dipping

*** 10-20 leaves crispy fried Basil leaf – optional - see notes below


How to:

- In the medium bowl, gently mix together crab meat, basil pesto, and Parmesan cheese for the filling
- Fill each wonton wrapper with 1 heaping tablespoon of the crab filling in the center and dap little water around the edges of the wonton wrapper, fold up all the four corners of the wrappers to meet in the middle and press them together. Continue with the rest and put the crab pockets in the fridge for 5 minutes before frying
- Set the oil in the frying pan over low heat and wait until the oil is hot
- Fry 3 or 4 or 5 of crab pockets each time (depends on your frying pan size) until they turn slightly golden – be really careful on this step because the wonton wrapper can burn easily if the oil got too hot.  Continue frying the pockets until finish.
- Serve warm with Thai sweet chili sauce or sauce of your choice

***If you want to add crispy fried basil, you can fry basil leaves first before frying the crab pockets.  It only takes seconds to fry basil leaves. but be careful though when frying fresh basil leaves because the oil will splash like crazy!!!


Enjoy!
 
^__^


Wednesday, July 10, 2013

The Pink Detox Drink...


There is no secret that I love to eat, and you all already know that. Right? As I get older, I’ve always take more precaution about what I eat and what I have taken in to feed my body. You know, I want to be as healthy as I can but never hope to live to be 100th or something like that. Noooo…too long! I think if I can make it through to be 80th without scratches and bruises, and a handful of medications to just keep me alive day by day, I’d be truly blessed!

But sometimes I just wander off the healthy track and indulge myself with high calories food and keep eating without thinking too much about consequences. And more often that my overeating is surely caused by stressed.


And this is the reason that, once in a while, I have to remind myself to slow down and make sure that I won’t go too far off the healthy track as I’ve planned.   By having a fruit or veggies smoothie with or without yogurt 4-5 days a week is one of the options I have that I’m trying to stay away from my doctor. Last time I check, I only visit my doctor once a year just for physical checkup!  Hooray for that!


Be Healthy. Be Happy.


What you need:   for 1 big glass

1 cup Watermelon, chopped
1/2 medium apple, unpeeled and chopped
A handful seedless red grapes
1 stalk celery, chopped
2-3 thinly sliced fresh ginger
1 tbsp. lemon juice
1/2 cup pineapple juice
1/2 cup crushed Ice
 *add honey or sweetener as preferred

: Blend everything in the blender until smooth and frothy
 
 
Enjoy!
 
^__^


Monday, July 8, 2013

Boba Thai Tea Pops


It’s popsicles time!

It doesn’t matter what kind, the healthier version with fruit or the creamier and sweeter version loaded with cream and sugar.   I believe there is no one could deny an ice cold Popsicle when the weather has become brutally hot like this.

I am a sucker for a good ice cold pops!   And forget the calories counting for this one.


Let’s start making popsicles for this summer with the high calories and sweetest Thai Tea popsicles.   If you like to drink the oooh-sooo-sweeet Thai ice tea, with or without boba, this Thai tea pops would not disappoint you, especially when having it after a long hot day, and especially after having spicy food like my last post – Yum Moo Yor! 

 
What you need: can be made up to 12 2-oz size, but I only made 8

6 cups filtered water
3 tbsp. Thai tea mix (I used Pantai brand)
1/4 cup sweet condensed milk (more or less as you desired)
1/2 cup black boba tapioca pearls – optional


How to:

- Brew the tea with your normal coffee maker
- Stir in sweet condensed milk and let it cool
- Cook the tapioca pearl according to the package - Fill 1-2 tablespoons of cooked tapioca pearl into the Popsicle molds, follow by the cooled tea. Place the Popsicle sticks to each one and freeze them in the freezer for at least 6-8 hours or overnight

Enjoy!
^___^


Yum Moo Yor / Vietnamese Pork Loaf Spicy Salad


I have a bad habit, and I need to confess. I love to eat………. too much! 


Here’s another popular Thai spicy salad dish I like to eat, especially when a group of friends get together for the evening chat and some drinks.    It’s almost like a must-have dish, along with Yum Woon Sen, to get the party started.    Oh geeez…now I’m feeling homesick!


When it comes to Thai salad, or “yum” (the word says it all…yummmm!!!), it usually makes with spicy dressing that include these basic ingredients – fish sauce, lime juice, sugar, garlic and Thai chili.   The level of spiciness, of course, depends on how each person is preferred. Just like other Thai salad, the dressing is based on these flavors – salty, sweet, sour, and spicy.   That’s it. If you feel uncomfortable using fish sauce, sea salt can absolutely be substituted.  


 Vietnamese steamed pork loaf, or Moo-Yor as Thais called it, can be purchased at most Asian supermarkets.  And the name already tells the hint of its origin, Vietnam.  Since Thailand and Vietnam are neighbor countries, Thai people have come to love this tasty pork loaf and incorporated it in many dishes such as this one.   The pork loaf is basically seasoned finely ground pork usually wrapped tightly with layers of banana leaf and then steamed.   Finely sliced and cooked pork skins are sometimes mixed into the pork loaf for the texture. And oh, you should know how much I love pork skins in my food. It give a “bite and texture” that makes the food so much more fun to eat.  Seriously!
The pork loaf is already cooked and ready to eat when bought from store. It’s widely used in noodle soup by slicing into strips along with other meats or meatballs.


What you need:   for 2-4 people

For salad:
8 oz. Cooked Vietnamese pork loaf, quartered and thinly sliced
1/2 cup white onion, thinly sliced
1/2 cup celery, thinly sliced
1/4 cup celery leaves or cilantro leaves, chopped
2 medium Persian cucumber, cut half lengthwise and sliced
1 large tomato, cut into wedge
5 small yellow vine tomatoes, halved – optional


For dressing:
5-7 Thai red chili, crushed or use 2-3 tbsp. Asian chili garlic sauce (depends on your preferred spiciness)
3 cloves garlic, finely minced or crushed together with chili
4 tbsp. fish sauce
4 tbsp. lime juice
1 tbsp. sugar

How to:

- fill water in the medium pot to boil, and add cooked Vietnamese pork loaf just to heat through for just 30 seconds.
- combine the entire ingredients for the salad in a large bowl
- in another medium bowl, whisk together the entire ingredients for the dressing until the sugar is dissolved and pour the dressing into the salad bowl and gently toss together to mix well. 
- the salad can be serve immediately; however, if lets it sit for 5 minutes or longer in the fridge until it’s ready to be served, it will definitely taste a lot better.


Enjoy!
 
^___^


Monday, July 1, 2013

Blueberry Crumb Bars


The weather in L.A. is getting hotter and hotter, and turning on the oven would be the least thing to do because it can heat up the whole house like a furnace. Bad idea.    However, I have a few good reasons to turn on the oven to bake this sweet treat.  

First, waking up in the morning the hubby was telling me that last night he dreamt about a gorgeous blueberry pie he saw at the buffet restaurant. What I could hear from him was…”I’ve been thinking about blueberry pie. Can you make me one?!?” Second, the morning’s weather was kind of a little strange. The morning was gloomy and cool like the rain has just passed when compared to the yesterday’s weather. And the sun hadn’t shown up even it was already nine o’clock! Third, I had not made any thing in the oven for a while since the hot summer weather has become a giant oven on earth, and I thought of today as a perfect opportunity to bake something easy and quick before the sun has realized that it has to show up to torment people as it supposed to do in the summer.


These blueberry bars turned out as delightful as I had hoped for, and the hubby was, of course, very happy about it even though it was not the blueberry pie he dreamt about. Maybe next time!

What you need:   make 9 - 16 bars depends on how you cut it

For crust:
1 cups all-purpose flour
3 tbsp. sugar
6 tbsp. cold unsalted butter, cubed

For filling:
3 cups fresh or frozen blueberries
1 cup sugar
1 small lemon juice + zest
1 tsp. vanilla extract
A pinch of salt
3 tbsp. cornstarch

For crumb topping:
1/4 cup all-purpose flour
1/4 cup roll oats
3 tbsp. sugar
1 tsp. cinnamon powder

How to:
 
- Preheat the oven to 350’F and grease the 8x8 pan with butter or cooking spray, set aside.   I also used a piece of aluminum foil over the pan which I forgot to grease the pan first!  Not good!
- Combine blueberries, sugar, lemon juice and zest, salt, and vanilla in the medium pan over medium heat and cook until the sugar is dissolved, ant then add cornstarch and stir. The filling will turn thick, take off the heat and let it cool
- In a mixing bowl, prepare the base crust by using the pastry cutter cut butter cubes into flour until it form crumbs.  Press the based flour into the bottom of the greased pan evenly and bake for 12 minutes.
- Make the crumb topping the same way of making the base, and set aside
- When the based is done, tale it out from the oven, fill in the filling, spread evenly with the crumb topping, put it back to the oven and bake for 35-40 minutes or until it’s bubbly and the crumb topping turn golden brown
- When it’s done, let it complete cool down for at least 4 hours before cutting in to squares


Enjoy!
^__^