Friday, December 28, 2012

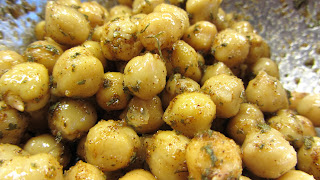
Crispy Garlic Chickpeas


I have come across many foodie blogs about roasted chickpeas (aka garbanzo beans) with different ways of seasoning the beans for quite sometimes now and I just want to give it a try since I always keep cans of garbanzo beans in my pantry,…and… because I ran out of my healthy snack roasted almonds.
 
I've never gave this a try before when I usually eat them by adding in salad or soup and now I've learned how easy that was to make this healthy, tasty crispy snack at home whenever I wanted.

Oh mine……new addiction has begun!

There are many ways to experiment with flavors and however you like to suit your mood, spicy, sweet, soy, sesame, garlic, Parmesan, just give it a try using your imagination. You never know you might find the new way of loving the chickpeas to be your next best thing of flavor snack like I do. Be careful though when you start eating them, you just can’t stop until they’re all gone! So, make lots of them just in case a friend might drop by.


What you only need: 

1 can chickpeas (Garbanzo beans) 
1 tbsp olive oil 
1/2 tsp salt 
1/2 tsp garlic powder 
1/2 tsp paprika 
1/2 dried parsley 

Preheat the oven to 400’F degree


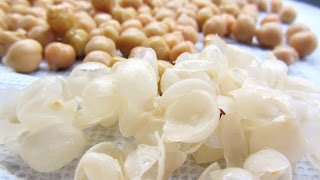
- Rinse the beans with cold water and pat dry with paper towel and discard excess skins


- Season with olive oil, salt, garlic powder, paprika, dried parsley and toss well

 
- Place the seasoning beans on a baking sheet with a single layer and bake at for 40-50 minutes or until they turn golden brown and crispy, shake them once after 25 minutes just to rotate the beans.


Enjoy!
^_^


Wednesday, December 19, 2012

Cranberry-Honey Jam, Satsuma Orange Gelee, & Honey Yogurt Verrines


I promised you that I would make something with the cranberry that I've left from my smoothie and I have come up with two…ahhh...bonus! Who doesn't like bonus?

After debating between cranberry-orange muffins and cranberry-apple cake, I ended up making this quick cranberry jam and verrines – dessert in tiny glasses.


Verrines and parfaits are quite the same which they all resemble multiple layers of ingredients and artfully serve in clear glasses. The differences are that verrines are served in small glasses with a few bites and you’re done with it, while parfaits are usually double or triple the size of verrines and served in tall glasses.

The truth is I love them both!  ^_^

To allow the tangy tart in cranberry to shine through the sweetness of the orange juice and honey, I only cooked the jam in a short period of times, only 10 minutes or so. The jam has a very tangy-sweet with a soft touch of honey. It tastes great on toasted breads or pancakes with a hot cup of coffee in the morning……oh soooo….perfect!


Since the last time trip to the market, I bought a 5 lb bag of sweet Satsuma orange and have been eating them for quick healthy snacks which only half of them left sitting pretty on the counter. I decided to use a couple of them to make these simple verrines because I thought it would look so amazing with the ruby red color from the cranberry and the yogurt.

 
See, it looks sooooo gorgeous….  Don’t you think?


  S-i-m-p-l-y-L-i-c-i-o-u-S! 


Simplest Cranberry Honey Jam:

2 cups fresh cranberry
1/4 cup sugar
3 tbsp honey
1 medium orange juice + zest
1 tsp vanilla extract

Add everything in a small pan over medium-high heat and let it cook while smashing to break down the cranberry with the back of spoon for 7-10 minutes.
Turn off the heat and let it cool down before refrigerate it.


Satsuma orange gelee:

1/4 c. fresh squeeze Satsuma orange juice + 1 tsp zest
1 tsp gelatin powder
1 tbsp water
*1 tsp honey – this is optional to add to the orange juice if you think you need it. I didn’t put in mine since the orange juice was already sweet.

Mix water and the gelatin powder, set aside.
Warm the orange juice + zest in the microwave for 20 seconds, and then stir in the gelatin (and honey if used) and mix well.
Strain the orange mixture through the fine strainer and divide them among 4 shot glasses for the 1st layer, chill in the refrigerator for at least 2 hours or until it set.


Honey Yogurt

1/2 cup nonfat plain yogurt
1/2 tbsp honey
1/2 tsp gelatin powder
1 tbsp water

Mix together water and gelatin and set aside.
Separately microwave 1/4 cup of the Greek yogurt for 20 seconds, the gelatin mixture for 7 seconds, and quickly whisk them together, stir in the rest of the Greek yogurt and honey.
Divide the yogurt over the orange glee for the 2nd layer and chill another at least 2 hours.
When the yogurt firm and set, spoon 1 or 2 teaspoons of cranberry jam on the top layer and garnish with a wedge of Satsuma orange if you like. Serve chilled.


Enjoy!

^__^


Friday, December 14, 2012

Cranberry-Pineapple-Yogurt Smoothie


I love this time of the year when I can find a bag of fresh cranberry in stores.   So I got a bag another day and all I think about is making myself a smoothie.   I just love the tangy flavor in cranberry, especially when paring with pineapple or orange juice that provides its natural sweetness to a smoothie and the honey and yogurt that make this smoothie just creamy and perfect. 
So, I got my cranberry with pineapple, and yogurt smoothie fixed for breakfast to start my day today in order to keep the balance and try to stay as healthy as I could after I've been eating “whatever I feel like” for the last few weeks.
I still have some of cranberry left and I've already planned of making something for my next post.  See you then.  J


What you need:
1/4 cup or a handful of fresh cranberry
1/2 cup fresh or frozen pineapple chunks
1/4 cup pine apple juice
1/2 cup/4 oz. nonfat plain yogurt
 1/2 cup crushed ice
1 tbsp honey

: Blend everything in the blender until smooth and frothy.  Serve 1 or 2 if you want to share... J


Enjoy!
^__^


Wednesday, December 12, 2012

Green Tea Soba Noodle Salad with Sesame Soy Ginger Dressing


First of all, I don’t really want to think of myself as a noodle hoarder, but the truth is whenever I have a chance to go to the markets, I’d always buy packages of both dried and fresh noodles since I make noodle dishes all the time. And for the record, I am an Asian and I crazy for noodles! Hehehe…

My noodle dish today I go for a refreshing, light, and healthy noodle salad with leftover rotisserie chicken for lunch. This salad is easy to make since the chicken is already cooked. As for the veggies, use any combination that you have such as sweet bell pepper, baby spinach, Napa cabbage, and cucumber would work perfectly to the dish. I wish I had some of cucumber in my fridge to make this salad even refresher, but I didn’t have it, wahhhh!!!


The tasty dressing is so simple to whip up in seconds, and you can also control the amount of the chili sauce as much or as little as you like, or use chili flakes, add hard-boiled egg for the additional protein and to make it a beautiful looking dish, and the sesame oil added to the dressing just gives this salad such a wonderful explosive flavor. This green tea soba noodle salad is absolutely refreshing, healthy, and delicious. It’s easy to make and impressive to serve to friends and family at anytime.


What you need: 

100 g dried Green Tea soba noodles
2 cups cooked chicken, chopped/shredded
1/2 cup snow peas, cut diagonally and blanched
1/4 cup carrot, finely julienned and/or thinly slice
2 hard-boiled eggs, quartered

For the dressing:

2 tbsp light soy sauce
1 tbsp toasted sesame oil
1 tbsp rice wine vinegar
1 tsp toasted sesame seeds, plus 1/2 tsp for garnish
2 clove garlic finely chopped
1 tbsp fresh ginger finely grated
1 tbsp chili garlic sauce
1/2 tsp sugar
2 scallions, thinly sliced, plus for garnish 


How to:

1. Add all the ingredients for the dressing in the mixing bowl and mix well, set aside
2. Bring water to a boil over medium-high heat with a pinch of salt. Cook the dried noodles as you would with dried pasta, drain and rinse well under running cold water and put them in a large bowl, and then add cooked chicken, snow peas, and carrot.
3. Pour the dressing over the noodle bowl and gently toss then together to mix well
4. Serve the green tea noodle salad with the garnish of hard-boiled egg, sesame seeds, and thinly slice scallions. 


Enjoy!
^__^


Monday, December 10, 2012

Green Curry Seafood with Asparagus and Zucchini


There are many basic Thai curry dishes such as red, green, yellow, or Panang curry, but if you asked which one I preferred, I’d say green curry. I think the green curry has its own unique taste from the fresh green chilies used in the curry paste that separates itself from other curries. Some people might say that green curry is the mildest curry among other curries, but that’s not true, since you, the cook, is the one who control the degree of spiciness – increase or decrease the chili paste as you prefer. And the same is true with other Thai curries. I love spicy and when I make the green curry, the hubby would complain about how spicy it is every times; he prefers red or yellow curry to green curry.

When it comes to making curries, especially Thai curries, most people will probably be intimidated by it when thinking about making chili paste if you have to make it from scratch. Well, I WAS one of you out there before because my experience helping my dad making chili paste was very painful to me.


My dad loved red curry and more often that he made it without coconut milk which Thais called it “Kang-Pa” and it’s very very very spicy! And when he used coconut milk, he made his own fresh coconut milk, and I also learned that from him. I helped my dad making chili paste using a big heavy-duty granite mortar and pestle to grind up all of the spices and it took me at least about half an hour, or more sometimes, to finish hammering it up to my dad standard of its consistency. The chili paste had to be really smooth and well blended, no lumps, no coarse, or I had to keep beating it until my arm would fall off from my body. Why was it painful…you asked? For crying out loud, I was only 10! I could have just run off and disappear, but I just loved being around in the kitchen too much whenever my dad was cooking – to see and to learn the process, to smell the food cooking on the stove, and the most important part, I got to taste it first….before anyone else! And yes, what you are thinking right now is right. I was the chubby one in the house!
Since l moved to the U.S., I didn't’ make chili paste anymore. If I would make it today by using the granite mortar & pestle, I bet that my neighbor would probably call the cops for making too much loud noise!     I've tried making it using food processor, but it’s just not quite the same. 

Today you can find any kinds of Thai curry chili paste in most supermarkets, and the two brands I often use for my curries are Maesri and Mae Ploy brand. That is very convenience! Thai curries are fast and easy to make as long as you have everything cut up and prepare before start the cooking process, the basic is always the same. However, the time of cooking may vary depends on what kind of meat you use – beef, veal, pork, chicken, fish, or seafood, and the vegetables - anything you like - need to be careful not to overcook them.


Now…are you all set? Why don’t you try making all of the Thai curries and let me know which one you like the most. How’s that sound?

What you need:

7 oz Shrimp deveined 
7 oz Cod or other white fish, cut in to 1x2 inch
7 oz Squid, cleaned and cut in half
1 can (13.5 fl.oz.) coconut milk
1 cup water
2 tbsp green curry paste (more or less for your preferred spiciness)
2 tbsp fish sauce
1 tbsp sugar
A pinch of sea salt
2 cup asparagus cut into spears
1 small zucchini cut into bite size
A handful of Thai basil leaves
1 small green jalapeno slice
1 small red or yellow bell pepper slice
3 kaffir lime leaves, tore into small pieces by hand

How to:
- add 1/4 cup coconut milk in a wok, a sauté pan, a heavy bottom pot over medium heat, wait for a few seconds until the coconut starts to bubbling, and then add green curry paste, stir to mix well until it turns fragrant
- add coconut milk and water, seasoning with fish sauce, sea salt, and sugar
- add asparagus, zucchini, bell pepper, and jalapeno, gently stir and let them cook for 3 minutes or so
- add shrimp, squid, cod fish, and kaffir lime leaves – try NOT to stir at this point, just gently push the seafood under so that the coconut milk covers the entire meat, cover the pan with lid and let it cook for 7-10 minutes or until the seafood is cooked through, BUT seafood is meant not to be overcooked or it will become tough and rubbery
- turn off the heat and add Thai basil leaves
- serve immediately with cooked jasmine rice


Enjoy!

^__^


Wednesday, December 5, 2012

Easy Grilled Calamari


Have you ever had fresh grilled squid or calamari at the beach? I think it’s the best way, really, to eat squid – fresh caught from the fisherman and grilled almost immediately by the vendor, dipped in spicy a homemade dipping sauce….omg! I just tortured myself by just saying that, and now I really want to go to the beach, especially the beach in Thailand!


So, today I’m having grilled squid since I’ve been thinking about how much I enjoyed eating grilled squid by the beach in Thailand lately. I bought a package of frozen squid another day with the idea of making Thai spicy squid salad…but I grilled them instead. I used frozen squid because they were already cleaned and I was too lazy to clean the fresh squid (that’s awful sad…I knowww!) 


The squid I bought came in small tubes so I just left them whole and marinated them first just for 15 minutes with my no-recipe marinate sauce and served with Thai sweet chili sauce. Oh yeah!!! This sauce pairs well with everything I should have made my own spicy dipping sauce but the grilled squid looked too good and I just could wait to dig in. 


What you need:

1 1/2 lb small squid (or calamari) tubes fresh or unthawed if frozen (I bought them frozen and already cleaned)
2 tbsp oyster sauce
1 tsp sesame oil
1 tsp ground black pepper
1 tbsp finely minced garlic
1 tbsp finely minced ginger
1 tbsp finely minced mint leaves
Short bamboo skews, soaked in water for at least 15-20 minutes to prevent burn when grilling
Thai sweet chili sauce - or your own homemade sauce - for dipping


How to:

- Mix oyster sauce, sesame oil, ground black pepper, garlic, ginger, and mint leaves into a medium bowl then add squid, and marinate them for 15-20 minutes.
- Thread 2 or 3 squid tubes through each bamboo skewer.
- Grill on the medium heat for 4 minutes on each side. Be careful if you let them cooked too long they will become rubbery.
- Serve immediately with Thai sweet chili sauce.

Enjoy!
^_^


Related Posts Plugin for WordPress, Blogger...