Saturday, September 21, 2013

Whole Wheat Peachy Lemon Poppy Seed Cake with Lemon Glazed

 
I have an itch to bake for quite sometimes now since my last popsicles I made for summer, but I just can’t decide what to bake first. When I turn around to ask the hubby, his answer would be his absolute favorite “Carrot cake!”  I should have known that already.   I asked him anyway if he would feel like to have a cake.   But the feeling of “just bake something” doesn’t work for me if no one want to eat it.   Right?

When it comes to baking, I’d more likely go for the unfussy and easy to put together recipes with a promise result.      Since I am just an amateur baker who thought herself to bake and like to try out what works and what’s not, I particularly try to avoid those recipes with too many techniques involved.    Not because I don’t want to learn to bake something that new to me (I have chiffon cake on my list that I’d like to learn how to bake one of these days), but I just have too many lazy bones in my body (what a silly excuse!).  


So, I go for the easy one today with the ingredients I already have in my pantry.  And also it’s my last chance to bake something with sweet juicy summer fruit like peach – Whole Wheat Peachy Lemon Poppy Seed Cake with a Drizzle of Lemon Glazed.     Sounds yummy!

I used organic whole wheat flour for my recipe but you can absolutely use all-purpose flour or mix half of each.    One thing that I forgot to add was either ground cinnamon or ground ginger or just some ground all-spiced to give it a hint of awesomeness.  
This recipe is definitely a keeper.   I can say it is a perfect cake to take to a potluck party for sure.


The cake came out surprisingly and incredibly moist with the perfectly right amount of sweetness.
Thankfully for the lemon glazed I poured on top of the cake that slowly seeping all the way through the cake to keep the cake moist and crate the lemony sweet goodness.   Though the hubby was not crazy about the poppy seeds as much as I did, but he finished a huge piece with cool whip on the side in no time.  Yay, he didn’t like it at all (with my eyes rolling).


What you need:   for 1 9-in round cake pan

For cake:

1 1/2 cups organic whole wheat flour
3/4 cup sugar
1 1/2 tsp. baking powder
1/2 tsp. baking soda
1/2 tsp. salt
2 tbsp. poppy seeds
1 tsp. vanilla extract
1/4 cup vegetable oil
3/4 cup low-fat plain yogurt
2 large egg
1/4 cup fresh lemon juice
1 tbsp. lemon zest
2 peaches peeled and sliced


Lemon glazed:

1 1/2 cup powdered sugar
1/4 cup lemon juice
: Whisk together to mix well


How to:

- Preheat the oven to 350’F and lightly grease a 9-in round or square pan with butter or cooking spray and set aside
- In a medium bowl, combine flour, poppy seeds, baking powder, baking soda, and salt, set aside
- In another large mixing bowl, whisk together eggs, oil, and sugar for 2 minutes, and add in lemon juice and zest, vanilla, and yogurt, then stir in the dry mixture in 3 batches until well blended (I whisk everything by hand. If you have electric mixer, it would be easier and faster)
- Pour the batter into the cake pan and give it a shake to make it even
- Arrange the peaches on top of the batter, or however you like, and gently push them down into the batter a little
- Bake for 40-45 minutes or until the taster comes out clean
- When the cake is done, take it out from the oven, let cool for 10 minutes, and then drizzle with lemon glaze on top
- Let cool before serving or serve warm with your cup of coffee or your favorite tea


 Enjoy!
 
^__^


Monday, September 16, 2013

Quinoa Tabbouleh


Shhh…. Did you hear that? The loud screams of freshness coming out from this salad.


Whenever the hubby and I go to the Middle Eastern restaurant, I usually fill myself up with pita chips, hummus, tzatziki, and tabbouleh while the hubby enjoys a few leg of lamb, lentil soup, and baklava.


By all mean, lentil soup and baklava are my favorite, too! But not so much for a leg of lamb. Yeah, I know what you are thinking. Since I don’t eat beef, the lamb meat has a pretty strong taste and smell close to beef. Though I have tried “a bite,” I had threw up because of its strong flavor that just trapped in my throat and wouldn’t go down. I bet it’s good because the hubby enjoys it so much every time. I don’t mind though because I enjoy my tzatziki and tabbluleh so much every time as well.


 And today I feel like making tabbouleh myself at home with a little extras of quinoa and cucumber to add a little more body into it. But, what did I tell ya? While making this salad and after shooting a few pictures and after I finish eating this salad, I could hear the loud screams, “oh, I’m so F-R-E-S-H” til the end of my last bite. [shhh…. I was almost licking my plate!]


 What you need:   2-4 servings

1/2 cup dried quinoa
1 bunch parsley, finely chopped
1 cup mint leaves, finely chopped
2 medium Roma tomatoes, cubed
1/2 red onion, finely chopped
2 small/1 medium Persian cucumber, cubed
1 medium Lemon juice and zest
3-4 tbsp. olive oil
1/2 tsp. salt
1/2 tsp. black pepper
1/4 tsp. ground cumin
A tiny pinch of sugar


How to:

- Bring 1 cup of water to a boil, add dried quinoa, stir and low the heat to simmer. Let it cooks for 10-15 minutes with the lid cover, check and stir occasionally, until all the water is absorbed and the quinoa is cooked. Set aside and let cool completely.
- In a large mixing bowl, combine parsley, mint, onion, cucumber, and quinoa.
- Whisk lemon juice and zest, olive oil, salt, pepper, cumin and sugar to blend well, pour over the salad and toss to mix well.
- Leave the salad in the refrigerator for at least 30 minutes to set and enhance the flavor before serving

Enjoy!
 
^_^


Sunday, September 15, 2013

Soda-Soy Braised Spicy Riblets


These succulent looking riblets was not meant to be posted. But after the taste test result, I have to say, “Why not share this with the world?” Yeah, why not?

My first initial plan for these riblets was to cook them over the hot grill. But my lazy bones at the moment disagreed with me. It was not only because the hot weather in the afternoon that started to heat up, but also I had to make another side dish to go with it as well. As a result, I skipped steps. Instead of put those riblets on the grill and try to cook the marinated juice down to make a thick sauce to brush on the riblets while grilling, I decided to cook them in the aluminum foil pan all together with the marinated juice over the medium heat grill and forget about it for almost an hour in order to get them soft and tender. I also wanted to cook the sauce down as much as possible. Surprisingly, the sauce had cooked down and caramelized the riblets from the bottom up which created the grilled effect to the riblets with the shiny and sticky sauce all over.


My first reaction was not so sure how those riblest would come out. But after my first bite, I went nuts! “OMG!” The riblets were soft and tender, but not to the point that I could say that it will melt in your mouth. The caramelized sauce was so T-A-S-T-Y with a huge kick of spiciness from those chili and garlic I added into the marinade.

All I can say is that I licked my fingers clean eating these riblets. I will definitely make it again with chicken drumsticks next time.


What you need:

2 lbs. pork riblets, cut and cleaned
1 can soda – any flavor, coke, sprite, sierra mist, etc.
10 cloves garlic, lightly smashed
10 Thai red chili, lightly smashed
1/2 cup packed brown sugar
1/4 cup soy sauce
1/2 tbsp. ground black pepper


How to:

- Whisk brown sugar, pepper, and soy sauce, add garlic, chili, soda, and stir to mix well
- Pour over the pork riblets and let them marinade overnight in the refrigerator
- Turn on the grill to medium
- Transfer the marinated pork and everything to a aluminum foil pan and set it over the grill, close the grill and let it cook for 40 minutes with another piece of aluminum foil cover on top. Give the pan a shake once or twice in between. After 40m minutes, the juice should be reduced, uncover and cook for another 15-20 minutes, the juice now will turn scorch brown and caramelized. Take off the heat immediately.
- Serve with a sprinkle of chopped green onion, with rice, coleslaw, salad, or as you wish.


Enjoy!
 
^_^


Friday, September 13, 2013

Papaya Smoothie Detox


Seriously, I was not going to post it because I was afraid that you might say, “oh no, not another smoothie!” But one thing that you may already (or not) know that I drink my smoothie every (late) morning, sometime with or without adding yogurt. I love drinking smoothies not just for the glorious taste but also the wonderful nutrients I get from them. You know? You are not getting any younger! Plus, they make me feel like a Wonder woman who can take on anything that comes her way!


At the same time, I have so much fun trying out new combination of fruit, veggies, and juice and whatever fresh ingredients I have on hand at home that sometime the hubby never dared to try it with me, especially the detox one. What I’m trying to say is that, more for me!


What you need:   for 1 big glass

1 cup ripe papaya, cubed
1/3 cup orange juice
1 stalk celery, chopped
1 medium apple, chopped
1 tbsp. lemon juice
3 thinly slices fresh ginger
1/2 cup crushed ice
Honey – optional

>> Add the entire ingredients in the blender and blend until smooth and frothy


Enjoy and Stay Healthy!
 
^_^


Thursday, September 12, 2013

Peachy Gingered Limeade Popsicles


I made these popsicles about a few weeks ago when the heat in L.A. was so unbelievably HOT.    The day I was making them, I’ve locked myself up in the ice-cooled conditioning house with my two dogs because I was too afraid to go outside dealing with the brutally heat.   As soon as they got frozen, I ate one after another like crazy trying to cool the heat from the inside out.   And then the next day, the temperature had gone down about 20+ degrees, from 95' F to 68' F instantly, UNBELIEVABLE!  


However, making popsicles are the most fun thing I love about summer.   They are easy to make and they can be made using almost anything you have on hand, just use your unlimited imagination.  


This might be the last popsicles I made this summer season because the cool breeze of fall has been waiting to show up just around the corner.    But hey!  who say I can't have popsicles with my sweater and scarf on! 
 

What you need:   for 10/2oz. popsicles

1 cup chopped fresh peach (2 peaches)
3/4 cup simple gingered syrup
1/2 cup fresh lime juice

: blend everything in a blender until smooth
: fill 2 oz. popsicle molds, insert the sticks, and freeze at least 6 hours before serving
 
 
 Enjoy!
 
^__^


Friday, September 6, 2013

Chicken Salad Bite with Gingery Pickled Daikon & Carrot and Thai Spicy Peanut Sauce


Honestly, before I put this up, I don’t really know what to call it.   Chicken lettuce wrap?    Nah, it’s not a wrap!    Breadless Chicken Bahn Mi, perhaps?    Nah! Even though I was inspired by Bahn Mi sandwich, but I must give some respect for the authentic Bahn Mi.
 
Let’s say “Chicken Salad Bite” then.   Because it is a kind of salad in a small bite.

And since I’ve made pickled daikon and carrot, one essential element of Bahn Mi, I’ve posted it from the previous post, I just wanted to show you how easy that is to incorporate the pickled in a typical everyday salad like chicken salad using store bought rotisserie chicken. Besides, I don’t really feel like cooking today, except, making the quick and easy version spicy peanut sauce which took approximately 10 minutes to finish. This sauce tastes good with everything. I promise.


My chicken salad comes in a small bite because I feel like a "Diva" today after last night I had pampered myself (and the hubby) with a full body massage at our favorite massage place.   Each bite is packed with a punch of gingery spiced of the pickled and a little sweet spicy and crunchy kick of Thai peanut sauce.

And to make my “diva” moment even more divine, I served it with a well-chilled white wine just to keep me calm a little.    Cheers!   (-^_^-)


The Bite:    make as many as you like for your desired servings

Shredded cooked rotisserie chicken
Lettuce leaves
Pickled daikon and carrot
Cucumber, thinly sliced
Cilantro leaves for garnish

Assemble: start with shredded chicken on the lettuce leaves, cucumber sliced and the pickled, followed by the peanut sauce and garnish with cilantro leaf.


Quick Thai Spicy peanut sauce:    makes approx. 1 cup
What you need:

1 cup coconut milk
1 tbsp. red curry paste
3/4 cup coarsely ground roasted unsalted peanuts or peanut butter
2 tsps. Salt
2 tbsp. sugar
3 tbsp. vinegar

How to:

Whisk coconut milk and red curry paste to mix well in a small sauce pan and heat it up on the medium heat. When it starts a little bubble boil around the edge of the sauce pan, add ground peanut (or peanut butter if used), and season with salt, sugar and vinegar. Let it cooks for another 3-5 minutes. At this point, if the sauce becomes too thick, you can add water to loosen up the sauce a little bit or as your preferred consistency. Take off the heat and let it cool in a room temperature before serving. Please keep in mind, the sauce will get thicken as it cool down.


Enjoy!
 
(^_~)


Thursday, September 5, 2013

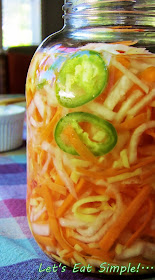
Gingery Daikon and Carrot Pickle


Pickled daikon and carrot is very popular and famously used as one of the ingredients in Bahn Mi, a
well-known and tasty Vietnamese sandwich. The people I knew have had it and they loved it. Sadly, I have never tried once. What stopping me to try it? You might wonder. Well. Where should I start? I’m not normally eating sandwich. I remember having a tuna sandwich on whole wheat bread skipped the cheese at work for lunch from a nearby favorite lunch spot whenever I forgot to bring my lunch from home probably 3-4 time a month averagely. And I don’t even make a sandwich at home.   Not to mention a burger since I don’t eat beef.    

Vietnamese Bahn Mi sandwich usually use a big thick French baguette that hollowed out the middle and stuffed with the yummy and tasty ingredients. I have seen the size and it looks too heavy for me. I’d rather have whole wheat bread instead if I wanted to try one. Don’t give me wrong. I know the baguette is a tasty bread, especially the crispy one which I have quite often making bruschetta or crostini at home. But I just can’t imagine myself eating the whole sandwich with those thick bread. I probably have to try one but just half of it. That would work!


Anyway, daikon, carrot, and ginger are my favorite vegetables that I always have them at home, or I may say I can’t live without them, besides garlic! It’s the kind of a must-have items at home. Since I’ve been cutting my own “baby carrot” for snack, after a while I got bored snaking on plain carrot sticks and I thought, “Let’s pickle them then!”

If you look at the ingredients listed below, you might be curious about how much the ginger I have added to it. One cup of fresh sliced ginger is a whole lot, probably too much. But what can I say, I am just in love with ginger. If you are not a fan of ginger, reduce or skip it no big deal. My pickle came out with a strong spicy gingerly taste. Plus, the heat from jalapeno even make it even bolder and tastier. And I just love it.


What you need:

1 lb. daikon, sliced into matchsticks
1 lb. carrot, sliced into matchsticks
1 cup ginger, sliced into matchsticks
2 medium green jalapeno, cut crosswise
3 cups warm water
1 cup distilled vinegar
1/2 cup sugar + 1 tbsp.
2 tbsp. salt + 1 tsp

How to:

: In a large bowl, combine sliced daikon, carrot, and ginger, then Sprinkle 1 tablespoon sugar and 1 teaspoon of salt over and use your two hands give it a massage until the vegetables are soften for about 5 minutes. Then rinse with cold water and drain. Transfer the vegetables into the prepared jar and sliced jalapeno. Set aside.
: Mix together warm water, vinegar, sugar, and salt and stir until the sugar is dissolved. Add the vinegar mixture into the vegetable jar, close lid tight and keep it in the refrigerator
: It can be serve the next day, however, for the best result and better flavor, keep it for a 2-3 days before serving as a side dish or in sandwich (Bahn Mi) or whatever you like.

 
Enjoy!
 
^__^


Monday, September 2, 2013

Yum Nua Yang / Thai Spicy Grilled Beef Salad


What’s grilling today?


If you have been following me for a while, you might want to know about how come I did not cook anything with beef.   That’s because I do not eat beef!   Why?    It’s just a personal reason and that I had stopped eating beef 20+ years ago and nothing more.    The hubby loves eating steaks and he would have his steak averagely 3 times a month, in which I cook for him quite often.   I usually cook it in the oven by pan searing on both sides first and put it in the oven under the broiler for 4 minutes each side for a medium rare.   I don’t mind cooking or smelling or touching a piece of steak but I just don’t eat it.  That’s all.   Besides, the hubby has never had Thai spicy grilled beet salad before since he only prefer a good cut of steak.


Today he brought home a big piece of flank steak which he planned for the easy grilled. Since I’ve never had anything cooking with beef on my blog, I told him that I would make a Thai spicy beef salad for him to try.    Would he say no to that?    Never!  


This Thai spicy grilled beef salad is one of the most popular dishes in Thai cuisine, and it’s the most popular dish among people from the North and the Northeast of Thailand.    Nowadays, the dish has become widely popular all over include international level.    And I am very proud of that.    


Flank steak is mostly used for this dish, but I think any part can also be used as well.  The steak is cooked as however you preferred (usually a medium rare) and the dressing can be mixed up with the basic ingredients that you can find at any Asian store and they can be substituted if you feel uncomfortable to use them, like use sea salt instead of fish sauce and omit the roasted rice powder. The dressing should have a balance of salty, sweet, and sour, however, there is no rule for that.  I’d say, there are two essential ingredients for the dressing – the roasted rice powder and mint leaves. Though you can omit the rice powder since sometime it can be hard to find but never forget the mint leaves.

And what the hubby said after?   “It’s very tasty.  It's good!”       That’s all I wanted to hear, really!


The dressing:

2 tbsp. fish sauce
2 tbsp. lime juice
1 tbsp. sugar
1 tbsp. dried chili flakes
1-2 tbsp. lemongrass, thinly sliced
1 tbsp. roasted rice powder *see notes below
2 tbsp. mint leaves, chiffonaded

>> Combine everything in a mixing bowl and whisk until the sugar is dissolved, set aside.


The salad:

8 oz. flank steak
2 small Persian cucumber, sliced
1/4 cup red onion, thinly sliced
Thai red chili – optional

*roasted rice powder can be bought at Asian supermarket. But it can also be made by using 1 cup of gluten rice roasted in a pan over medium-high heat, keeping stirring to prevent burn, and cook until the rice turn light golden. Using the coffee grinder (if available, or using food processor) to grind the roasted rice to powder. The rice powder can be kept in a tight lid jar for months.


How to:

- Grilled the steak to medium rare or as you preferred. Allow the meat to rest at least 5 minutes and then slice in thin strips across the grain of meat.

- In a medium bowl, add the steak, cucumber, red onion, the dressing, and toss together until well combined.
- Serve immediately with the garnish of Thai red chili and lettuce leaves and with steamed rice if desired. 


Enjoy!
 
^__^